 Timebridge
How it works
- 1. Connect onceEach person pastes their Clockify API key or Harvest token one time. No more logging in after every browser restart.
- 2. Track from the issuePick a project and task, press Start. Switching to another issue stops the old timer and logs it first.
- 3. Get Jira worklogsWhen the timer stops, the time is added to the issue's worklog under your name, so Jira reports just work.
Setup
Install
A Jira site admin installs Timebridge from the Atlassian Marketplace. It then appears on every issue in the right-hand panel as Timebridge · Time tracking.
Connect Clockify
- In Clockify, open your profile picture → Preferences → Advanced → Manage API keys → Generate new. Copy the key right away; Clockify shows it only once.
- On any Jira issue, open the Timebridge panel, choose Clockify, paste the key and click Connect Clockify.
- If your workspace stores data in a Clockify region (EU, USA, UK or Australia), pick it under Data region. Most accounts are Global.
- If you belong to several Clockify workspaces, switch between them at the bottom of the panel.
Connect Harvest
- Go to Harvest Developers and create a Personal access token. The page also shows your Account ID.
- In the Timebridge panel, choose Harvest, paste the token and the Account ID, and click Connect Harvest.
Harvest needs both a project and a task for every entry. Timebridge shows only the projects and tasks you're assigned to in Harvest.
Using timers
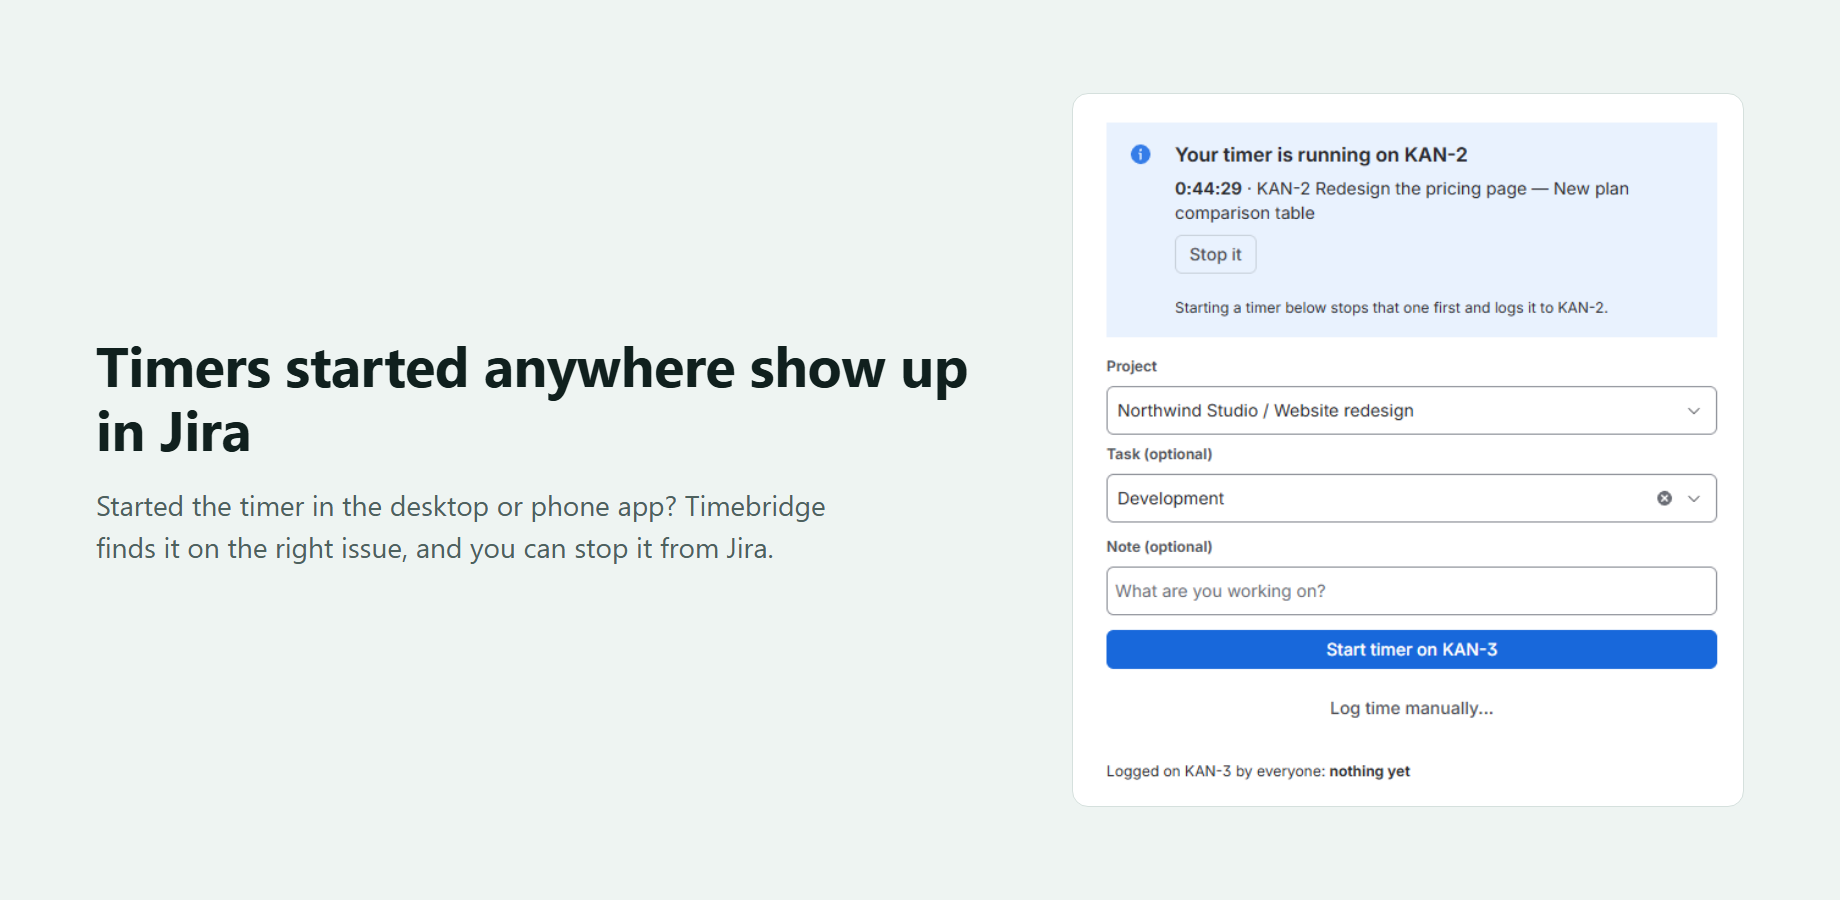
- Start: choose a project (and a task if you use them), add an optional note, and click Start timer. The entry in your tracker is named after the issue, for example
KAN-2 Redesign the pricing page. - Stop: click Stop timer. With Add to Jira worklog when stopped on, the time is added to the issue's worklog.
- Timers started outside Jira: if you start a timer in the Clockify or Harvest app and its description begins with the issue key (for example
KAN-2 …), Timebridge shows it on that issue and can stop it. Timers without an issue key still appear, but Timebridge can't add them to a Jira worklog. - Switching issues: starting a timer on another issue stops the running one first and logs it to its own issue.
- Forgot to start the timer? Use Log time manually: pick a date, a start time and a duration such as
1h 30m,90mor1:30.
Project settings (admins)
Project admins open Project settings → Apps → Timebridge to set:
- Jira worklogs: on or off for the project.
- Rounding: exact (nearest minute), or round up to 5, 6, 10, 15 or 30 minutes. Rounding applies to Jira worklogs only; your tracker keeps the exact time.
- Default tracker project and task, plus an optional task per issue type (for example Bugs → "Bug fixing").
People still choose per timer, and Timebridge remembers each person's last project in each Jira project.
Moving from the official Clockify or Harvest app
The official Jira apps from Clockify and Harvest run on Atlassian Connect, which reaches end of support on January 31, 2027, and Jira admins already see an "app might stop working" warning on them. To switch:
- Install Timebridge.
- Ask each person to connect their key once in the Timebridge panel.
- Uninstall the old app when you're ready. Your existing time entries in Clockify or Harvest are not changed.
FAQ
Does it work on Clockify's free plan?
Yes. Timebridge only needs an API key, projects and timers. Because time is written to Jira worklogs, the team can see totals in Jira even on plans where Clockify only shows people their own time.
Where is my API key stored?
In Atlassian Forge's encrypted secret storage, inside your Atlassian site. It's used only for your own requests and is deleted when you click Disconnect. See the privacy policy.
Who can see my timers?
Only you see your running timer in the panel. Jira worklogs follow Jira's normal permissions.
Can a timer be logged to Jira twice?
No. Each tracker entry is written to Jira at most once, even if Stop is clicked twice.
What if Jira refuses the worklog?
The timer still stops in your tracker, and the panel tells you the worklog failed (usually a missing "Work on issues" permission). Nothing is lost on the tracker side.
Troubleshooting
| Message | What to do |
|---|---|
| "… rejected this API key" | Copy the whole key again, or create a new one. For Clockify, check the data region. |
| No projects in the list | Clockify: create a project or check the workspace at the bottom of the panel. Harvest: ask a manager to assign you to a project. |
| "Allow access" button in the panel | Jira is asking you to let Timebridge read the issue and add worklogs as you. Click it once. |
| "Your Timebridge subscription is not active" | A Jira admin can renew it under Apps → Manage apps. |
Support
Email timebridge.support@gmail.com. We answer within one business day (Monday to Friday). Please include your Jira site address and what you clicked; never send us your API key.